Instructor Tools for Managing Canvas Courses

This page serves as a reference for faculty managing active Canvas courses.

It provides step-by-step guidance for common course management tasks you may need to complete throughout the term, including updating course content, adjusting due dates, grading assignments and quizzes, maintaining accurate Gradebook records, and managing integrated tools such as Cerego.

Use this page as a guide for both routine course maintenance and occasional tasks, such as creating Zoom links for office hours or individual student meetings.

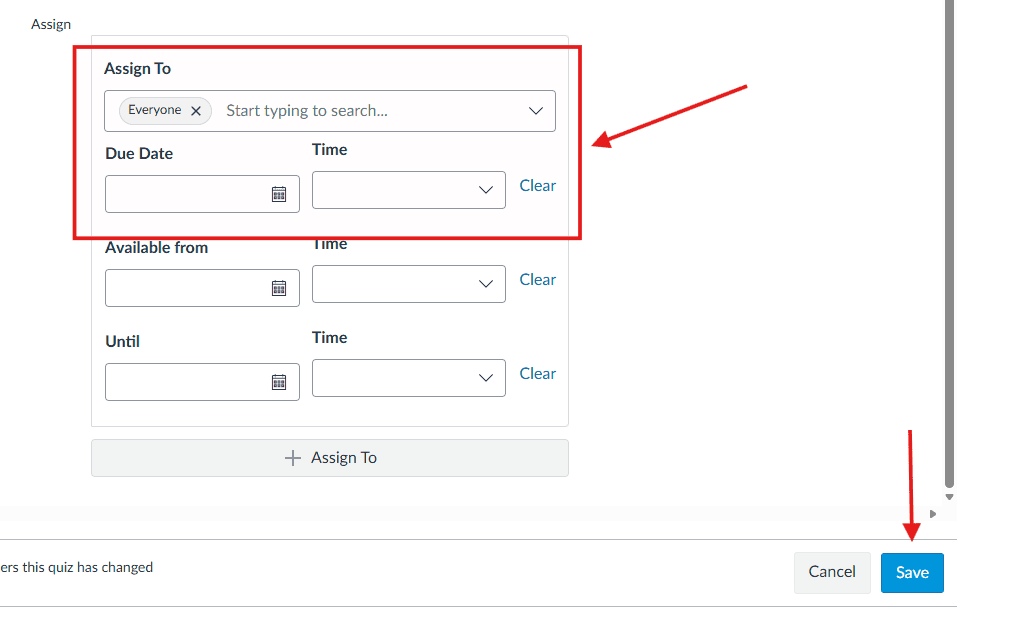
You can change the due date for a student or multiple students, while leaving the original due date (for all other students) intact.

  • Go to the Assignments section in your course.
  • Click the assignment you want to modify.
  • Click Edit in the upper-right corner.
  • Scroll down to the Assign section (by default, it says “Everyone”).
  • Click the +Add button.
  • In Assign to field, select the student(s).
  • In the Due field, enter the new due date.
  • Click Save or Save & Publish.
A software interface screenshot highlighting the Assign To section with date fields and a save button.

1. Click Grades in the left navigation.

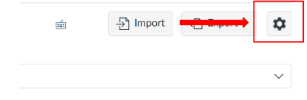
2. In the upper-right corner, click the Settings (gear) icon.

A red arrow points to a settings gear icon highlighted in a red box.

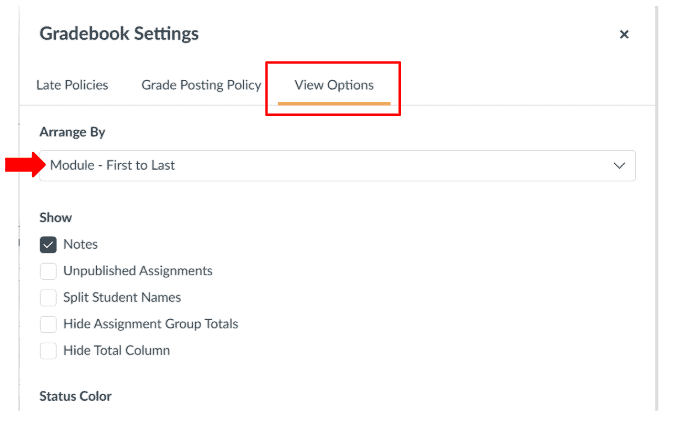
3. Select View Options.

4. Under Arrange By, choose Module – First to Last.

A screenshot of Gradebook Settings highlighting the View Options tab and Arrange By dropdown.

Some assessments are set up as “Quizzes” where students compose answers to questions. Instructors need to hand-grade students’ quiz answers to these questions.

1. Open the quiz assignment in SpeedGrader.

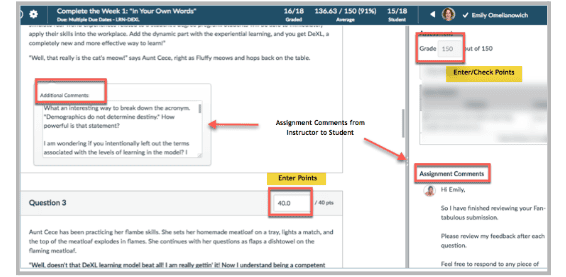
2. Review the student’s answer and provide feedback in “Assignment Comments” section and in the “Additional Comments” section as needed.

3. Enter the number of points earned for each hand-graded quiz question.

4. Check the final numerical grade in the “Grade” box.

5. Hit the blue “Submit” button.

Screenshot showing how to link assignment comments to free points in a Blackboard quiz.

NOTE: If comments are placed within the document or rubric, notify students in the Submission Comments that additional feedback is available and how to locate the feedback.

In most cases, Cerego (Learn Its) grades automatically sync to the Canvas Gradebook. However, if a grade does not pass back correctly, instructors may need to manually update the grade to ensure the student’s record is accurate.

The following video demonstrates how to review Cerego performance and manually enter or adjust a Learn Its grade in Canvas when a sync issue occurs.


Note: Learn more about the LTI 1.3 integration and how to access here: Accessing Cerego Data – BU Resource Center

You can allow one or more students to take a quiz additional times by using the Moderate This Quiz tool. This method adds attempts and does not erase previous submissions.

  1. Go to the main page of the quiz you want to modify.

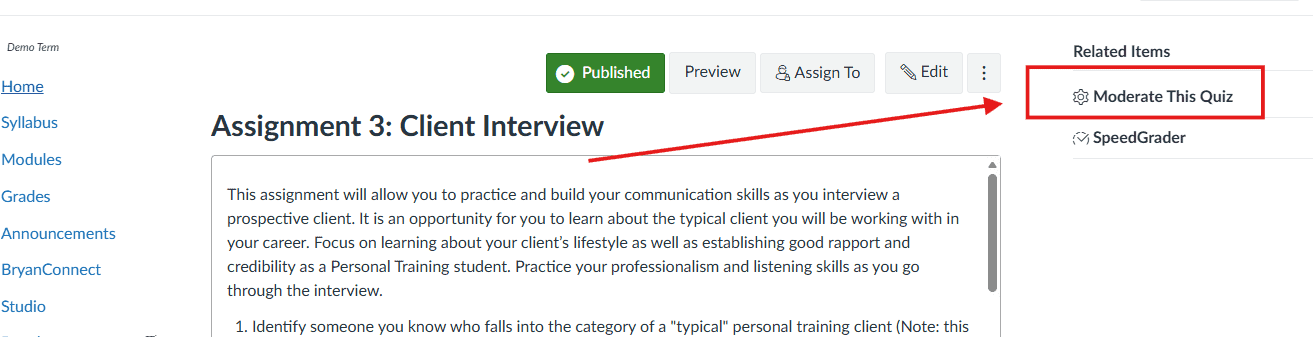
  2. In the upper-right corner, click Moderate This Quiz.

  3. Do one of the following:

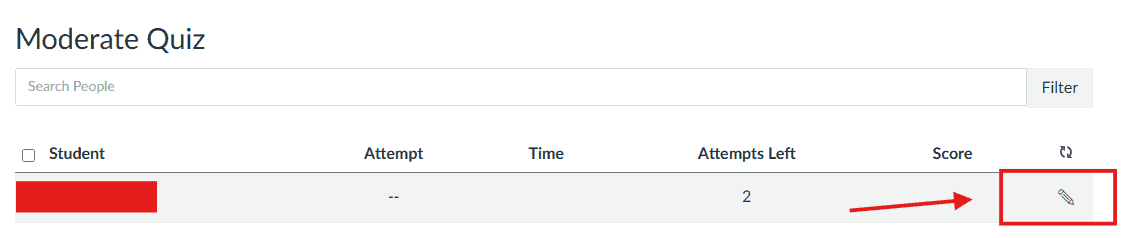
    • Click the pencil icon next to an individual student, or

    • Use the checkboxes to select multiple students.

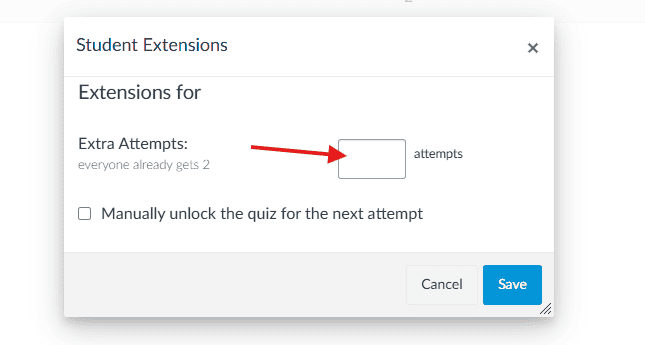
  4. In the Extra Attempts field, enter the number of additional attempts you want to allow.

  5. Click Save.

The selected student(s) will now be able to retake the quiz the specified number of times. All previous attempts remain visible to the instructor unless manually cleared.

A red arrow highlights the moderate this quiz button on an online assignment page.
A Moderate Quiz interface showing student data with a red arrow pointing to a download icon.
A dialog box titled Student Extensions displays a field for adding extra quiz attempts.

Faculty can add content to existing Canvas course shells. Course modules can be modified by faculty to add their personality and additional course resources.

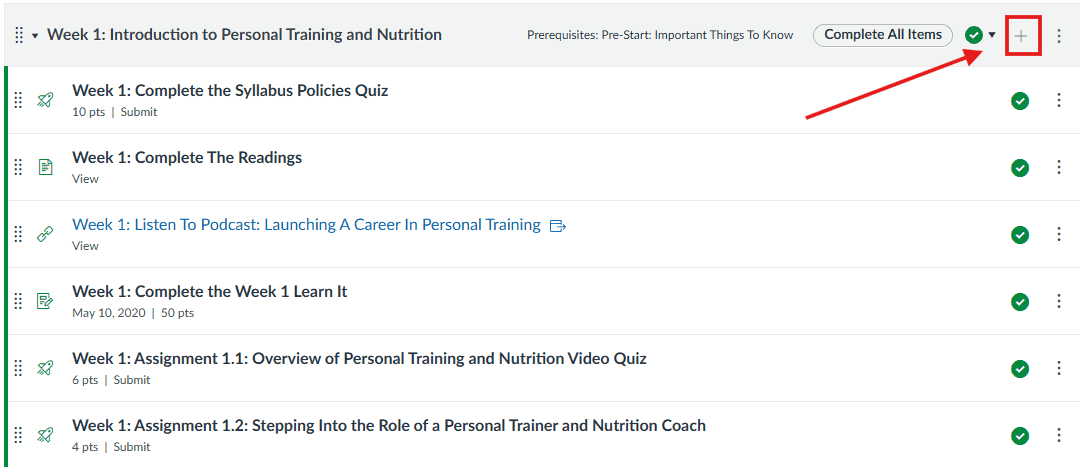
1. Once in a course, go to the “module” block where you want to add content. Click the “+” button at the top right of the module.

Online course quiz list showing completed weekly assignments marked with green checkmarks, pointed out by a red arrow.

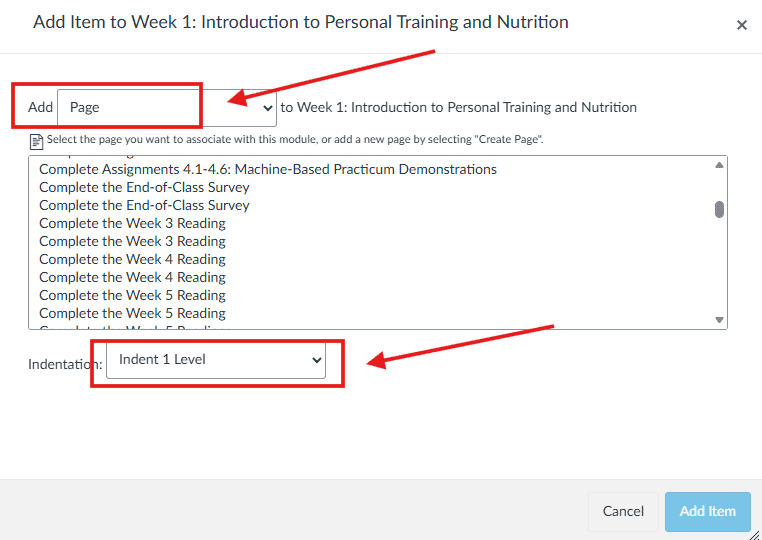
2. Select add “Page.” If preferred, select  “Indent 1 Level.”

Red arrows highlight the Add Page button and Indent 1 Level dropdown in a course content menu.

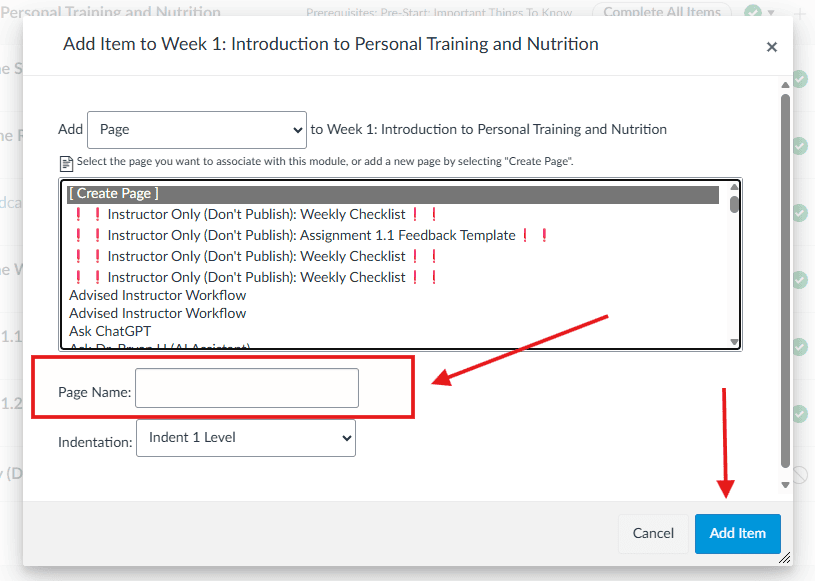
3. Select “New Page” and add a “Page Name” of your choice. Click the blue “Add Item” button.

Screenshot of a window to add a course module item, highlighting the page name field and the add button with red arrows.

4. Click “Edit” to edit your new page. Add the desired content to your new page.

5. When finished, publish the new content. To publish the content, click on the small “X” so that it turns into a green checkmark.

A red arrow points to a green icon next to the text 'Why this Class?' in a discussion list.

The Filter menu allows the Gradebook to be filtered by assignment group, section, modules, and grading period (if applicable). 

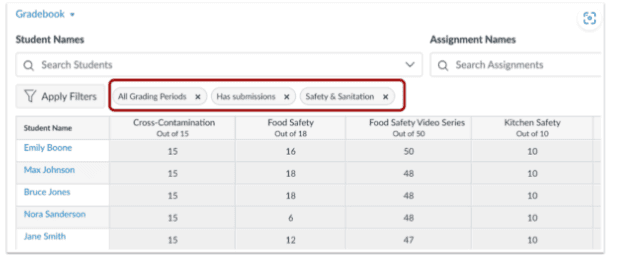
When a filter option is selected, the filter displays at the top of the Gradebook. Multiple filters can be used at the same time.

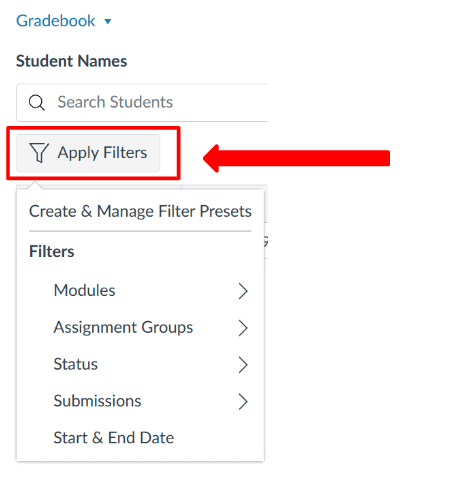
A red arrow points to the apply filters button above a dropdown menu of grading options.

Click the Apply Filters button. Then you can either create and manage filter presets or use the gradebook filters. More than one filter can be applied at any time. You can view by modules, assignment groups, status, submissions, and/or start & end dates. 

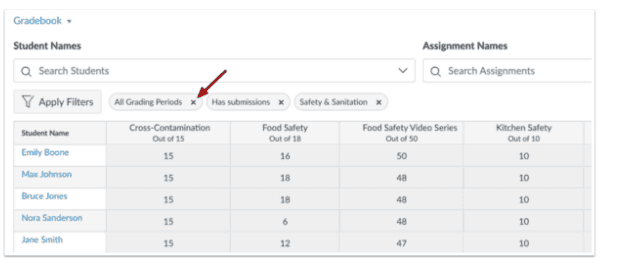
You can view the selected filters at the top of the grade book.

List of student names and assignment scores in a digital gradebook with filter options at the top.

To Remove filters, click the Remove icon.

A screenshot of a student grading interface showing scores for safety assignments.
  1. In your Canvas course, select Zoom Meetings from the course navigation. (If Zoom Meetings opens in a new tab, ensure pop-ups are enabled in your browser.)

  2. Select Schedule a New Meeting.

  3. Enter a meeting name (e.g., Office Hours).

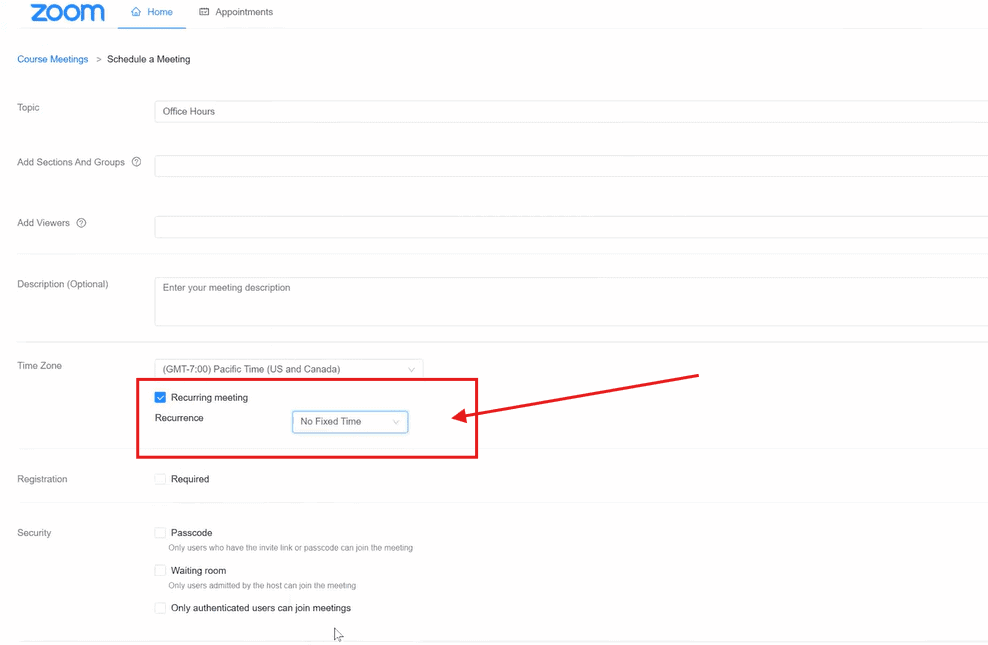
  4. Scroll to Recurring Meeting and select No Fixed Time. This allows the same link to be used anytime.

  5. Enable Join Before Host.

  6. Select Save.

  7. Copy the meeting link.

  8. Paste the link in a consistent, easy-to-find location for students on the live events page or equivalent. 

A screenshot of the Zoom desktop client schedule meeting window highlighting the meeting ID field.

Use this option if you prefer to create a meeting only after a student requests an appointment.

  1. Open Zoom Meetings in your Canvas course.

  2. Select Schedule a New Meeting.

  3. Enter a meeting name (e.g., Student Meeting – [Student Name]).

  4. Set the date and time for the meeting.

  5. Enable Join Before Host if appropriate.

  6. Select Save.

  7. Copy the meeting link and share it directly with the student (for example, through the Canvas Inbox).

Copyright 2025 | Bryan University | 350 West Washington Street, Tempe, AZ 85281

BRYAN UNIVERSITY LOGO SEAL

Copyright 2025 | Bryan University | 350 West Washington Street, Tempe, AZ 85281